You spent thousands building your dream home bar. You bought the Lindr machine, the Blade, or the converted Kegerator. You sourced the perfect keg of craft IPA.
But two weeks later, you pour a pint, and it tastes… metallic. Or sour. Or just “flat.”
Running this problem at your pub?
Here's the system I use at The Teal Farm to fix it — real-time labour %, cash position, and VAT liability in one dashboard. 30-minute setup. £97 once, no monthly fees.
Get Pub Command Centre — £97 →No monthly fees. 30-day money-back guarantee. Built by a working pub landlord.
The reality is that home bars often have worse hygiene than the dodgiest pub in town. Why? Because you aren’t drinking from them every day.
Beer sitting stagnant in a line for 5 days is a breeding ground for bacteria. If you want your home pours to taste like the taproom, you need to stop cleaning like a hobbyist and start cleaning like a pro.
The Pint Purity Test
Is your home bar serving taproom quality, or a bacterial cocktail?
You spent thousands on the hardware. But if your beer tastes metallic, sour, or flat after two weeks, your cleaning routine is likely to blame.
Answer 3 quick questions to get your Hygiene Score and a personalized prescription.
Your Prescription
Stop Oxygenating Your Beer
Hand pumps introduce air, causing the “cardboard” oxidation taste. You need to clean anaerobically.
Get the 5L Pressurized Bottle →Seal The Fruit Fly Trap
Leaving your tap open attracts flies and wild yeast. This causes sour, vinegar-like pints.
Buy Hygiene Brush & Plug Set →Dissolve The “Beerstone”
Eco-liquid won’t touch calcium oxalate deposits. You need professional line cleaner.
Get Purple Line Cleaner →Cellarman Certified
You’re cleaning like a pro. Your routine guarantees fresh, taproom-quality pours. Keep it up!
“Entertaining at home? Don’t let the roast ruin the pints.”
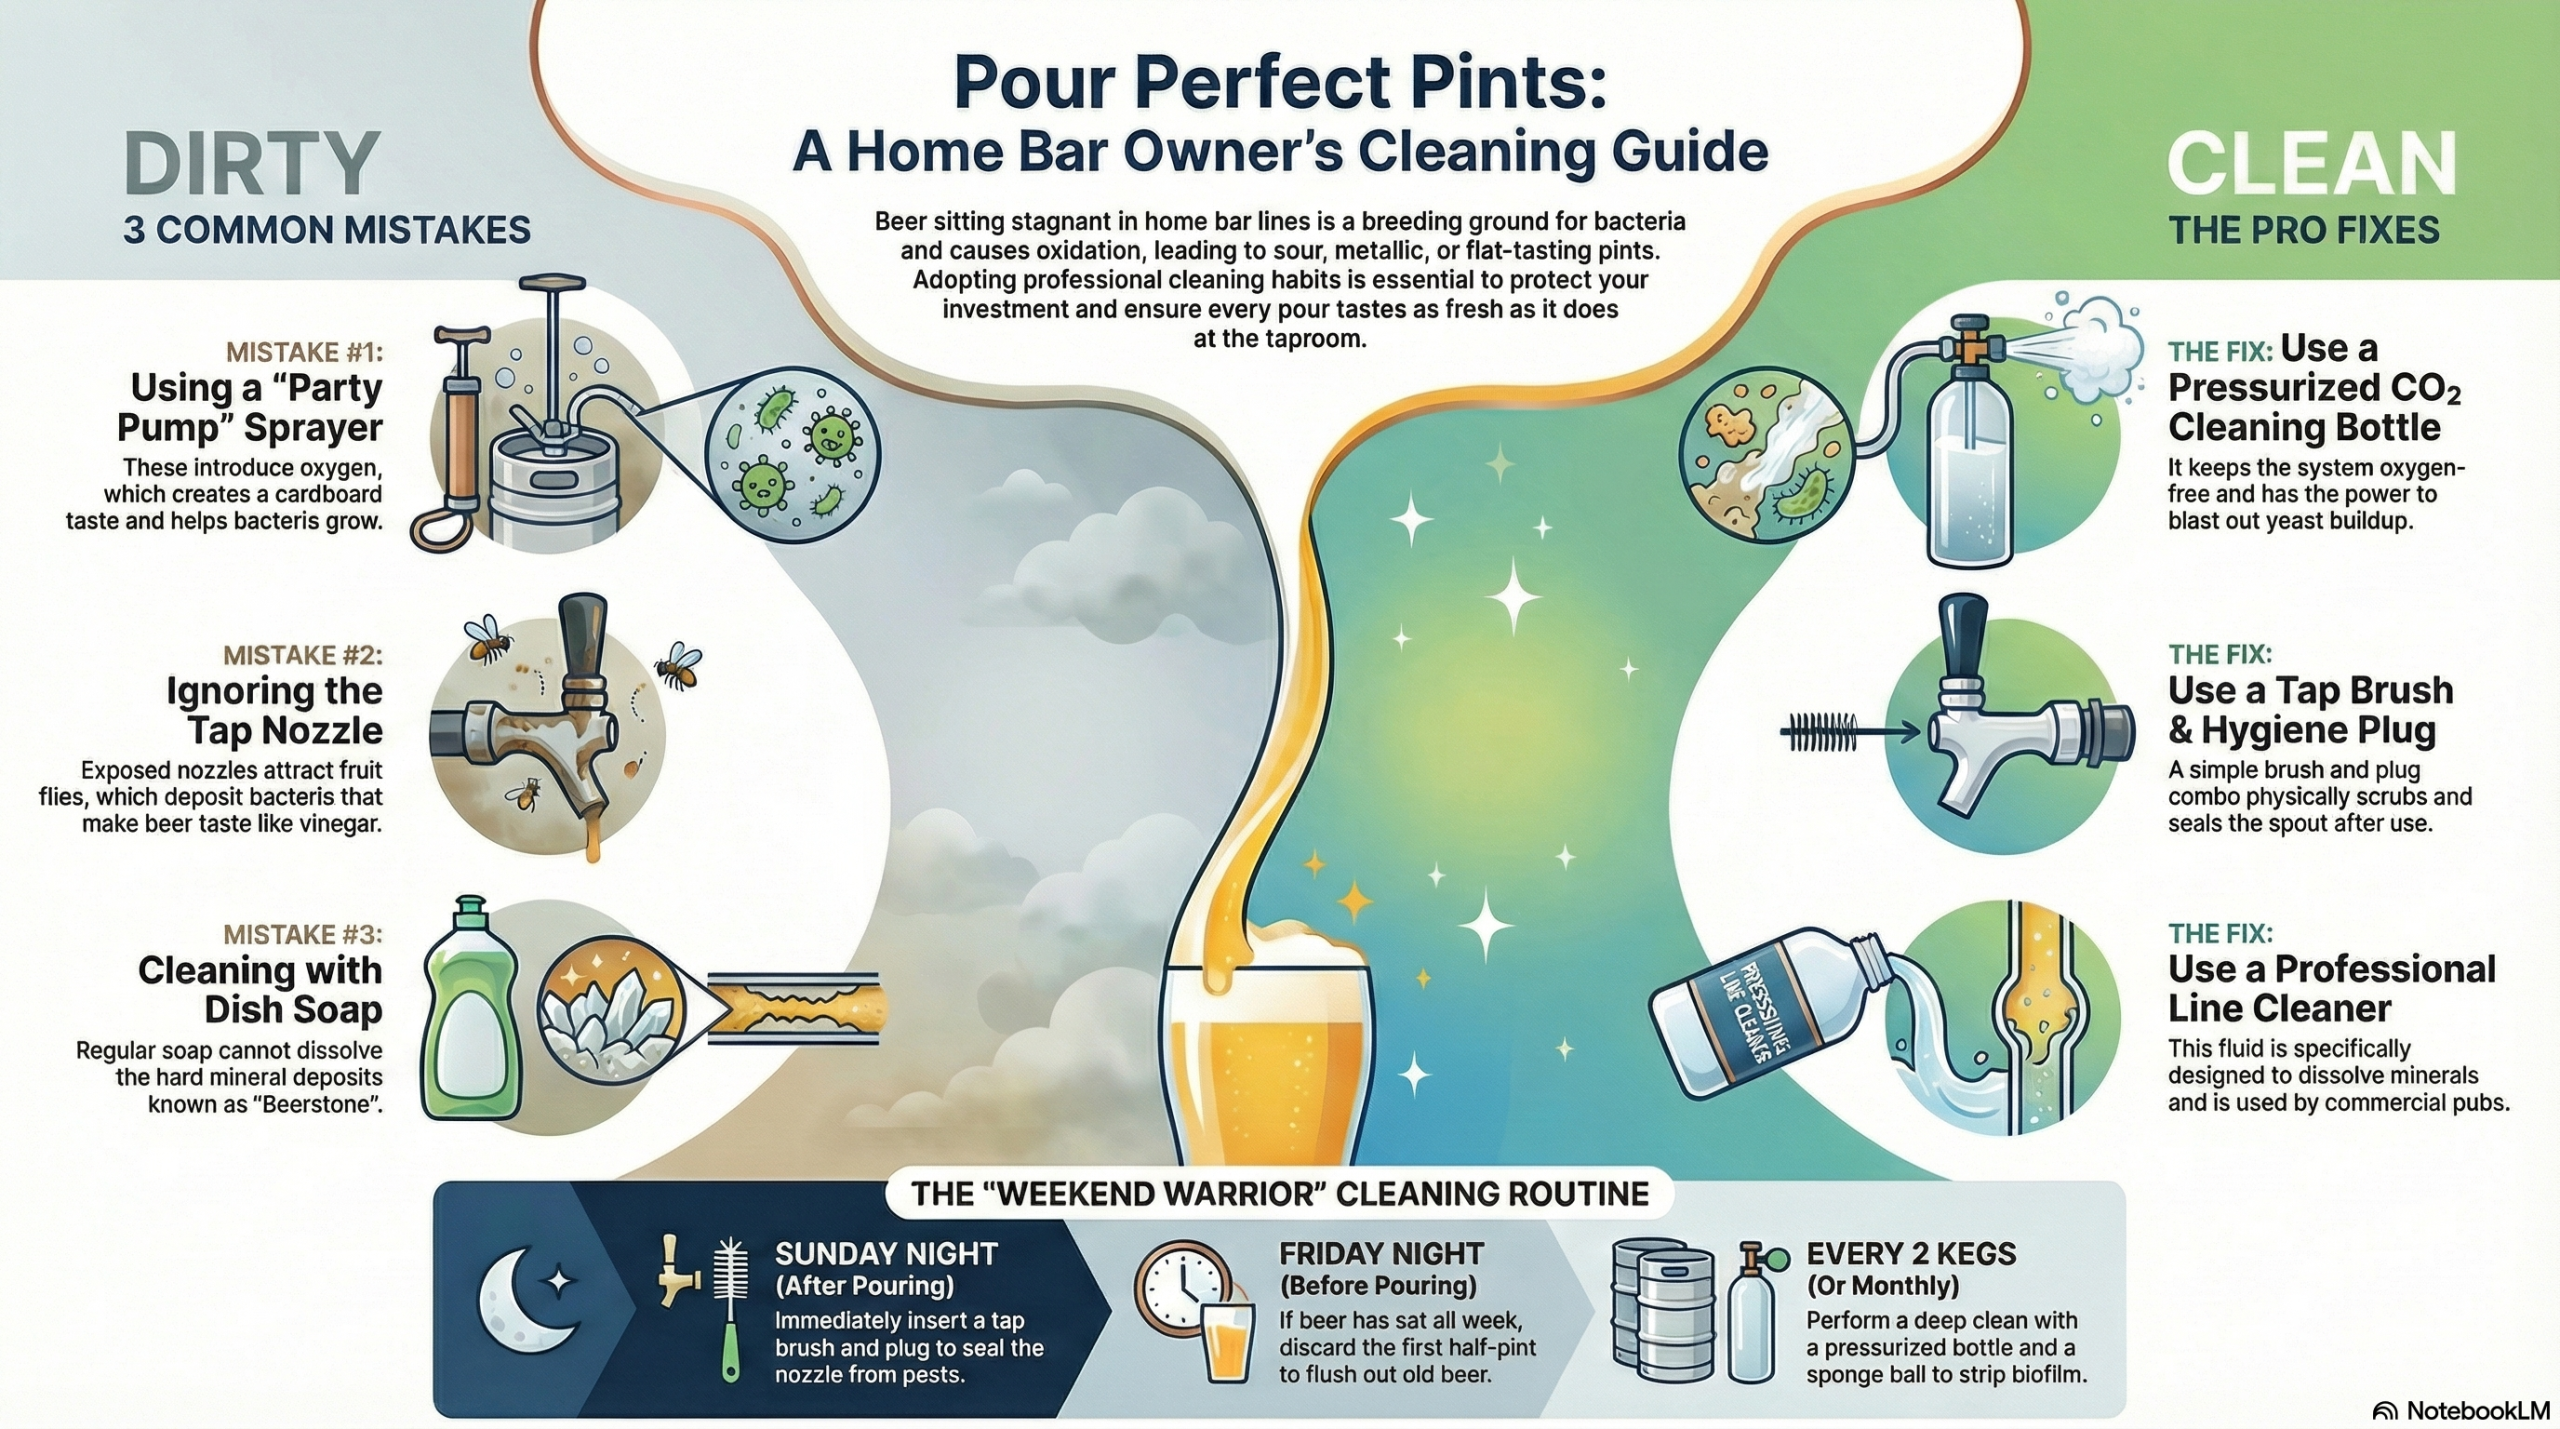
Use our Sunday Roast ForecasterMistake #1: The “Party Pump” Hand Sprayer
Most home kits come with a little hand-pump bottle that looks like a garden sprayer.
- The Problem: These introduce air into the line. Oxygen is the enemy of beer. It causes oxidation (cardboard taste) and encourages bacterial growth.
- The Fix: You need a Pressurized Cleaning Bottle that uses CO2, just like your kegs do. This keeps the system “anaerobic” (oxygen-free) and maintains the pressure needed to blast out yeast.
It might seem like overkill for a home bar, but a 5L Cleaning Bottle is the only way to guarantee a pub-quality pour.
Mistake #2: Ignoring the Nozzle (The Fruit Fly Trap)
In a commercial pub, the lines are flushed daily. In your home bar, the tap might sit unused from Sunday night until Friday evening. Sugar residue on the tap nozzle acts as a magnet for fruit flies and wild yeast. If a fly lands on your spout, it deposits acetobacter.
- The Symptom: Your first pint on Friday tastes slightly like vinegar or cider.
- The Fix: You need Hygiene Plugs and a Tap Brush.
- The Brush: Insert it into the spout when you finish your session. It physically scrubs the nozzle.
- The Plug: Seals the tap so nothing can fly in.
This is a £5 upgrade that saves a £100 keg from infection.
- Buy the Tap Cleaning Brush & Plug Set Here (Note: Using one of your generic accessory links here)
Mistake #3: Using “Eco” Washing Up Liquid
I see this on forums all the time: “Just flush it with warm water and lemon juice.” Stop. Beer leaves behind “Beerstone” (Calcium Oxalate). It is a hard, mineral deposit that warm water cannot touch. You need a proper line cleaning fluid designed to dissolve minerals.
- The Strategy: Buy a small bottle of Purple Line Cleaner. If it’s good enough for the pub, it’s good enough for your garage.
The “Weekend Warrior” Cleaning Routine
If you aren’t pouring daily, follow this “Shut Down” routine to keep your beer fresh for weeks.
Sunday Night (Post-Session):
- Brush & Plug: Insert your Tap Brush into the faucet. Do not leave the tap exposed to air.
- Wipe Down: Use a sanitizing spray on the coupler.
Friday Night (Pre-Session):
- The Flush: If the beer has sat for 5 days, draw off the first half-pint and discard it. This beer has been sitting in the “warm zone” of the font and is likely oxidized.
- The Taste Test: Taste the foam. If it’s sour, you missed a cleaning cycle.
Every 2 Kegs (Or Monthly):
- The Deep Clean: Hook up your 5L Cleaning Bottle.
- The Sponge: Yes, even home bars need mechanical cleaning. Push a 10mm Sponge Ball through to strip the biofilm.
The Verdict
Your home bar is an investment in pleasure. Don’t let a £5 saving on cleaning gear ruin a £150 keg of beer. Treat your setup with “Unreasonable Hospitality”—even if the only guest is you.
Entertaining at Home? If you are hosting a Sunday lunch to go with your fresh pints, make sure you don’t overcook the meat (or the budget). Use our Sunday Roast Forecaster to plan the perfect amount of food for your guests.
📊 Your EPOS tells you what sold. Pub Command Centre tells you whether you made money.
Real-time labour %, cash position and VAT liability in one dashboard. Built by a working pub landlord. £97 once, no monthly fees. 30-day money-back guarantee.
Get Pub Command Centre — £97 →For a working example with real figures, the Pub Command Centre is used daily at Teal Farm Pub (Washington NE38, 180 covers) — labour runs at 15% against a 25–30% UK average.
Running your pub on gut feel?
The Pub Command Centre gives you wet GP%, cellar checks, staff cost and weekly P&L — from your phone, every shift. £97 once. No subscription.
See the Pub Command Centre →